
SKU Views
A SKU View is a named set of products you pick out of your whole catalogue — “Spring Core”, “Trade Show”, “Best of Outerwear”. Unlike a list, which you build one product at a time, SKU Views are managed all at once in a matrix: every product runs down the rows, your views run across the columns, and a checkbox in each cell says whether that product belongs to that view. Once a view exists, you can flip the whole catalogue to show only its products with a single click.
Open SKU Views from the Views tab of the Lists & Views area, or from the catalogue toolbar — click the Views chip and choose Manage Views at the bottom of the menu.
The matrix
Section titled “The matrix”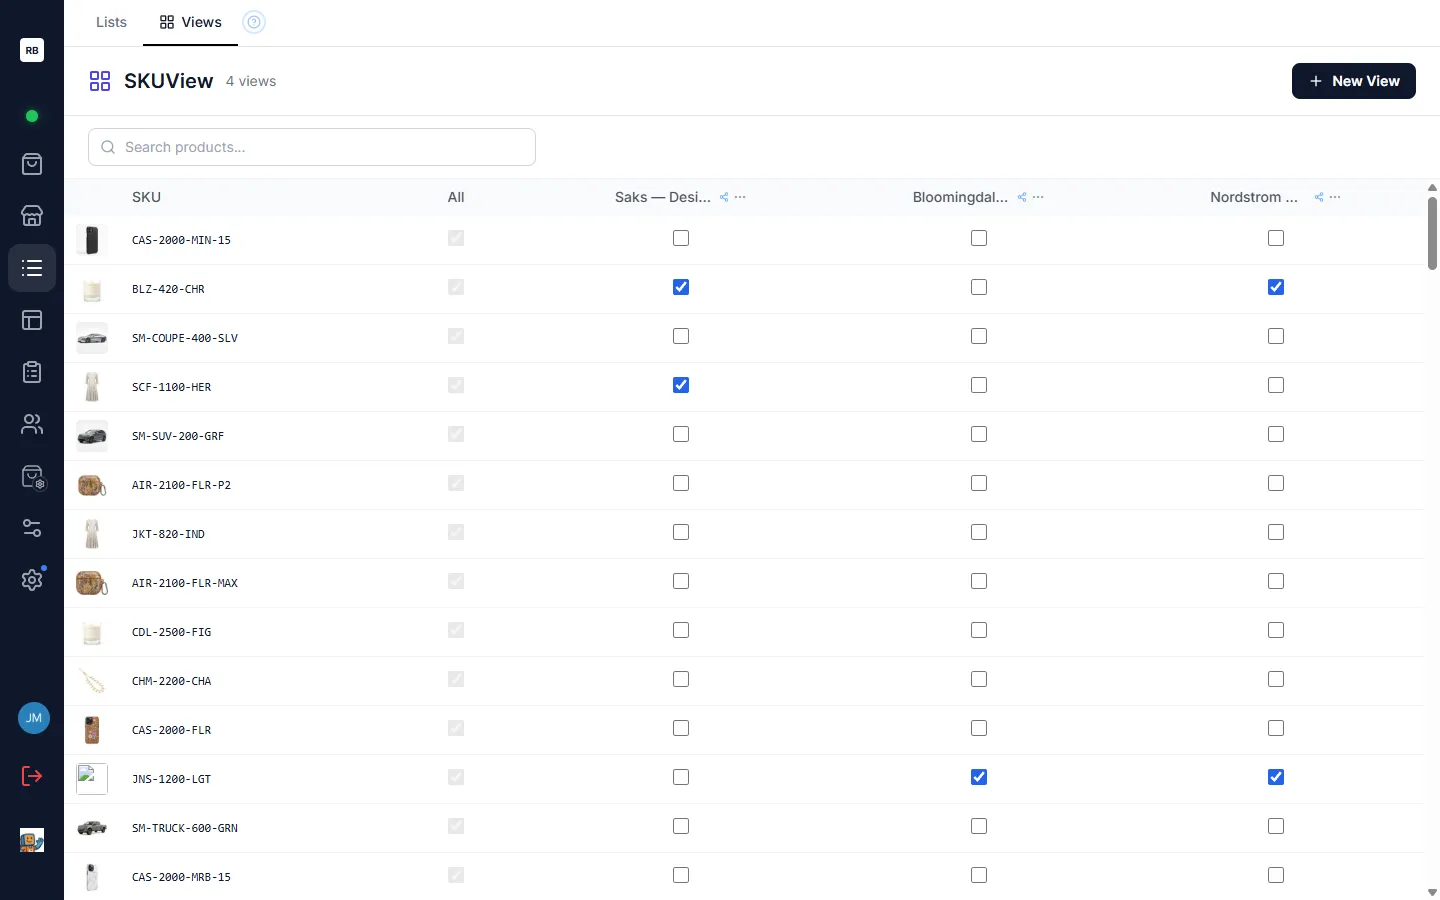
The matrix is a grid of products against views:
- Rows are your products, each with its thumbnail and SKU.
- Columns are your views. The first column, All, is every product in your catalogue — its checkboxes are always ticked and can’t be unchecked. Each column after it is a view you created.
- Cells are checkboxes. A checked cell means the product in that row belongs to the view in that column.
The matrix shows the first 500 products at a time. If you have more than that, use the search box to narrow down to the ones you’re looking for.
Creating a view
Section titled “Creating a view”Click New View, give it a name, and confirm. The new view appears as an empty column in the matrix, ready for you to check products into it.
Adding and removing products
Section titled “Adding and removing products”To put a product in a view, check the box where its row meets that view’s column. To take it out, uncheck the box. Each change saves on its own, so you can work down a column ticking products as you go.
Searching the matrix
Section titled “Searching the matrix”Type into the search box above the grid to filter the rows by product SKU, name, or style. The columns stay put, so you can search for a handful of products and quickly check them into (or out of) the right views.
Renaming and deleting a view
Section titled “Renaming and deleting a view”Each view column has an options menu — the ⋯ button in the column header:
- Rename — the column header turns into a text box; type the new name and confirm.
- Clone — makes a copy of the view under a new name.
- Share — makes the view available to your teammates; choose Unshare to make it private again.
- Delete — removes the view. (The All column has no options menu; it can’t be renamed or deleted.)
Filling a view from a list
Section titled “Filling a view from a list”You don’t have to build every view by hand in the matrix. If you already have a list of products, open it and use Send to View from the Actions menu at the right of the list’s title row. A small Add to View panel appears where you can:
- Pick an existing view from the list and click Add to drop all of the list’s products into it, or
- Type a new name and choose Create to make a fresh view already filled with those products.
The panel shows how many products are being sent. As always, a product that’s already in the view is skipped rather than duplicated.
Using a view to filter the catalogue
Section titled “Using a view to filter the catalogue”The real payoff is in the catalogue. The toolbar has a Views chip: click it and pick one of your views, and the catalogue instantly narrows to just that view’s products. The chip lights up and shows the active view’s name so you always know which view you’re looking at. Everything else — search, filters, sorting and grouping, card layouts, the product detail view — keeps working, now scoped to the view.
To go back to the full catalogue, open the Views chip again and choose Exit View.