
Sharing & List Tools
A list isn’t just a private collection — you can share it with precise, per-person access, save how it should look every time it opens, and act on its contents straight from the list toolbar. This page covers all three. For building lists and adding products, see Lists & Views.
Sharing a list
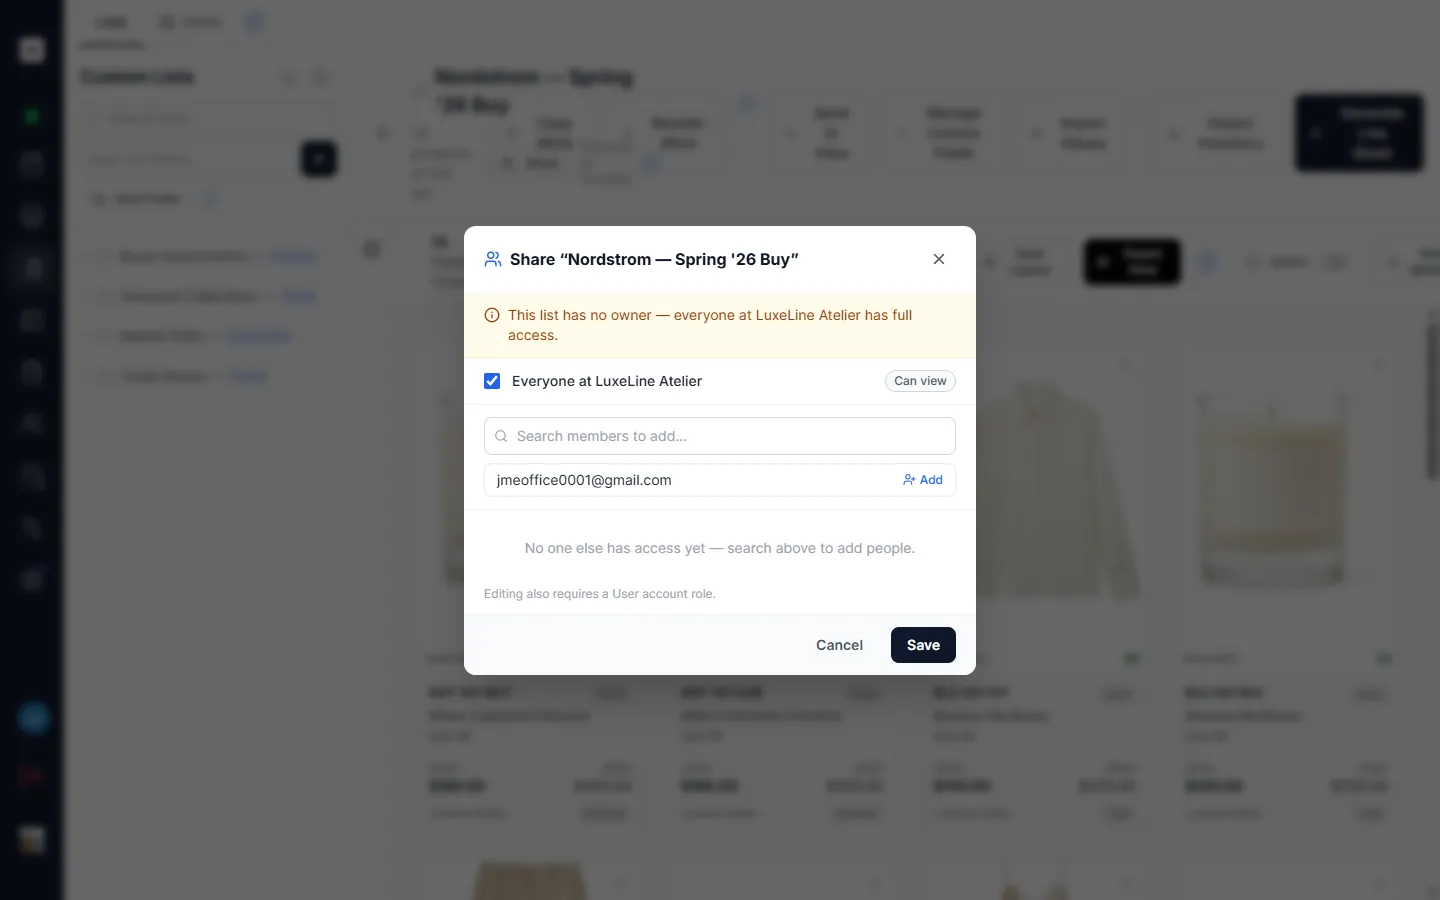
Section titled “Sharing a list”Open a list and click Share in its toolbar to open the sharing dialog.
Who can manage sharing
Section titled “Who can manage sharing”The list’s owner, Super Admins, and anyone with Can edit or higher access (whose account role is User or above) can open the Share dialog and change who has access. Regular Admins get no special sharing power of their own — an Admin needs a real edit grant like anyone else. If your access is view-only, you’ll see a badge showing who shared the list with you and your level, but no Share button.
Editors manage sharing within limits the owner never faces:
- An editor can lower or remove their own access (a handy way to leave a list that was shared to you), but never raise it.
- An editor can never grant anyone more access than they hold themselves — someone with Can edit can’t hand out Can edit & delete. Lowering or removing an existing higher grant is always allowed.
- The owner can’t be removed or demoted — their access doesn’t come from the grants list at all.
Transferring ownership
Section titled “Transferring ownership”The owner (or a Super Admin) can hand the list to a new owner: in the Share dialog, find them in the people list — if they don’t have access yet, add them from the member search box, click Save (which closes the dialog), then reopen it — then click the crown button on their row, Make owner. The previous owner automatically keeps Can edit & delete access, so nothing disappears from their sidebar. Ownership transfer is immediate, and the person doing the transfer needs at least the User account role; the new owner only needs to be a member of your workspace. On very old lists that have no owner, the dialog shows a Claim this list button instead; claiming makes you the owner and keeps the list visible to everyone at the company.
Access levels
Section titled “Access levels”Add a teammate from the member search box, then choose their level. Access is a ladder — each level includes everything below it:
| Level | What it allows |
|---|---|
| Can view | See and open the list, use its products in line sheets and SKU Views. No changes. |
| Can edit | Everything in Can view, plus add and remove products, rename the list, reorder SKUs, and edit custom-field values (inline or via Import Values). |
| Can edit & delete | Full control — everything in Can edit, plus deleting the list. |
Changing the structure of a list’s custom fields (adding, renaming, or removing the fields themselves) always requires the Admin role, even for people you’ve given Can edit & delete — see Custom Fields.
Editing requires a User account role
Section titled “Editing requires a User account role”Granting someone Can edit or Can edit & delete only takes effect if their account has at least the User role. A teammate on the Viewer role is capped at view access no matter what you grant them — the dialog notes this. If a teammate is capped at view access, ask an administrator to raise their account role to User or higher; once that changes, the edit access you granted takes effect. See Getting Started for what each role can do.
Share with everyone at your company
Section titled “Share with everyone at your company”The pinned Everyone at company row shares the list company-wide in a single switch. It grants view access to every user in your workspace — a quick way to publish a reference list without adding people one at a time. Sharing a single list company-wide is view-only by design; use per-person grants when someone needs to edit that one list. (A whole folder published to the company is separate — an admin can make everything inside it editable, as described below.)
Lists you can’t access are invisible
Section titled “Lists you can’t access are invisible”Access is all-or-nothing at the door: a list you haven’t been given any access to simply doesn’t appear for you — not in the sidebar, not in search, not anywhere. There’s no “request access” prompt, because the list’s existence isn’t revealed. Share a list to make it show up in a teammate’s Shared with me tab.
Sharing through folders
Section titled “Sharing through folders”You can also share at the folder level. In the Lists & Views panel, hover over a folder you own in the folder tree, open its options menu (the ⋮ button), and choose Share with Company — that makes the folder and every list inside it visible to everyone at your company. Once it’s shared, an Allow Editing option in the same menu lets everyone edit the whole folder at once — including deleting the lists inside it. This is the fastest way to publish a set of related lists — a shared “Trade Shows” folder, for example — without sharing each list individually.
Folder sharing and per-person list grants add together: a teammate gets a list if the list is shared with them or it lives in a shared folder. When a list is visible because its folder is shared, the list shows a Shared folder note instead of the per-list badge.
Saved view defaults
Section titled “Saved view defaults”A list can remember how it should be presented so it opens the same way every time — no re-sorting or re-grouping on each visit. A view default captures three things: the card layout (which fields show on the product cards), the sort (including “then by” levels), and the grouping. It deliberately does not save filters, so a saved default can never silently hide products.
There are two slots:
| Default | Who sets it | Who it affects |
|---|---|---|
| Organization default | An Admin (requires the Admin role) | Everyone who opens the list |
| Personal default | Any user, for themselves | Only that user — and it wins over the org default |
When you open the list, SKUMan applies your personal default if you’ve set one, otherwise the organization default, otherwise your usual catalogue preferences. Any changes you make to sorting, grouping, or the card layout while working in the list last only for that session — they never overwrite the saved default unless you save a new default. To set a default, arrange the list the way you want — card layout, sort, and grouping — then open the View defaults menu — it sits in the catalogue toolbar above the products when a list is open, not among the list header’s buttons — and choose Save current view as my default, or, if you’re an Admin, Save as organization default. The same menu also lets you clear a default or reset the list back to it.
The list toolbar
Section titled “The list toolbar”Opening a list shows its products in a full catalogue view — the same search, filters, grouping, and selection tools you use elsewhere (Sorting, Grouping & Selection) — with the list-specific actions collected in one Actions menu at the right end of the title row.
| Action | What it does |
|---|---|
| Rename | Change the list’s name (requires edit access). |
| Copy SKUs | Copy every SKU in the list to your clipboard, ready to paste into a spreadsheet or email. Disabled when the list is empty. |
| Reorder SKUs | Set the list’s presentation order by hand — paste or import a SKU order and the list arranges its products to match. Requires edit access. |
| Send to View | Copy the list’s contents into a SKU View, so you can build view-scoped tags, banners, and overrides on top of the same products. Disabled when the list is empty. |
| Manage Custom Fields | Define the fields that exist only on this list — order quantities, notes, ratings, and more (up to 50 per list). Admins only. See Custom Fields. |
| Import Values | Fill in custom-field values in bulk from a CSV or Excel file, instead of editing them one at a time. Requires edit access. See Custom Fields. |
| Export Inventory | Open Excel Studio with this list loaded, to design a spreadsheet — columns, grouping, totals, order-form quantity columns — and download it. See Importing & Exporting. |
| Generate Line Sheet | Jump straight into the Line Sheet Builder with this list already loaded. |
| Build Presentation | Open the Presentation Builder with this list loaded (only when that module is on). |
When you’re viewing a list someone shared with you as view-only, the editing actions (Rename, Reorder SKUs, Manage Custom Fields, Import Values) are hidden — you keep Copy SKUs, Send to View, Export Inventory, and Generate Line Sheet, which never change the list.
Every one of these lives behind the single Actions menu on the list’s title row, at every screen size, so the header stays one line tall and never pushes the products off the screen. Rename is the pencil next to the list name, and Share sits beside it.