
Custom Fields
SKUMan lets you attach information that isn’t part of the standard product record — a buyer’s order quantity, a selling comment, a forecast, a rating. There are two kinds of custom field, and they behave differently:
- List custom fields live on a single list. They exist only while that list is your working context, and they never change the underlying product records. Perfect for per-buyer data: give each buyer their own list, and each list its own fields.
- Product custom fields are defined once by an admin and apply to every product in your workspace.
Most of this page covers list custom fields — the flexible, everyday kind. The admin-defined product fields (and two related admin tools) are at the end.
List custom fields
Section titled “List custom fields”A list can carry up to 50 custom fields of its own. Because they belong to the list, two lists can have completely different fields — Company A’s list might track “PO Number” and “Ship Week” while Company B’s tracks “Forecast” and “Selling Comment” — with no overlap and no effect on the products themselves.
Managing the fields
Section titled “Managing the fields”Open a list, then click Manage Custom Fields in the list toolbar. This opens the field manager, where each field is a row you can configure:
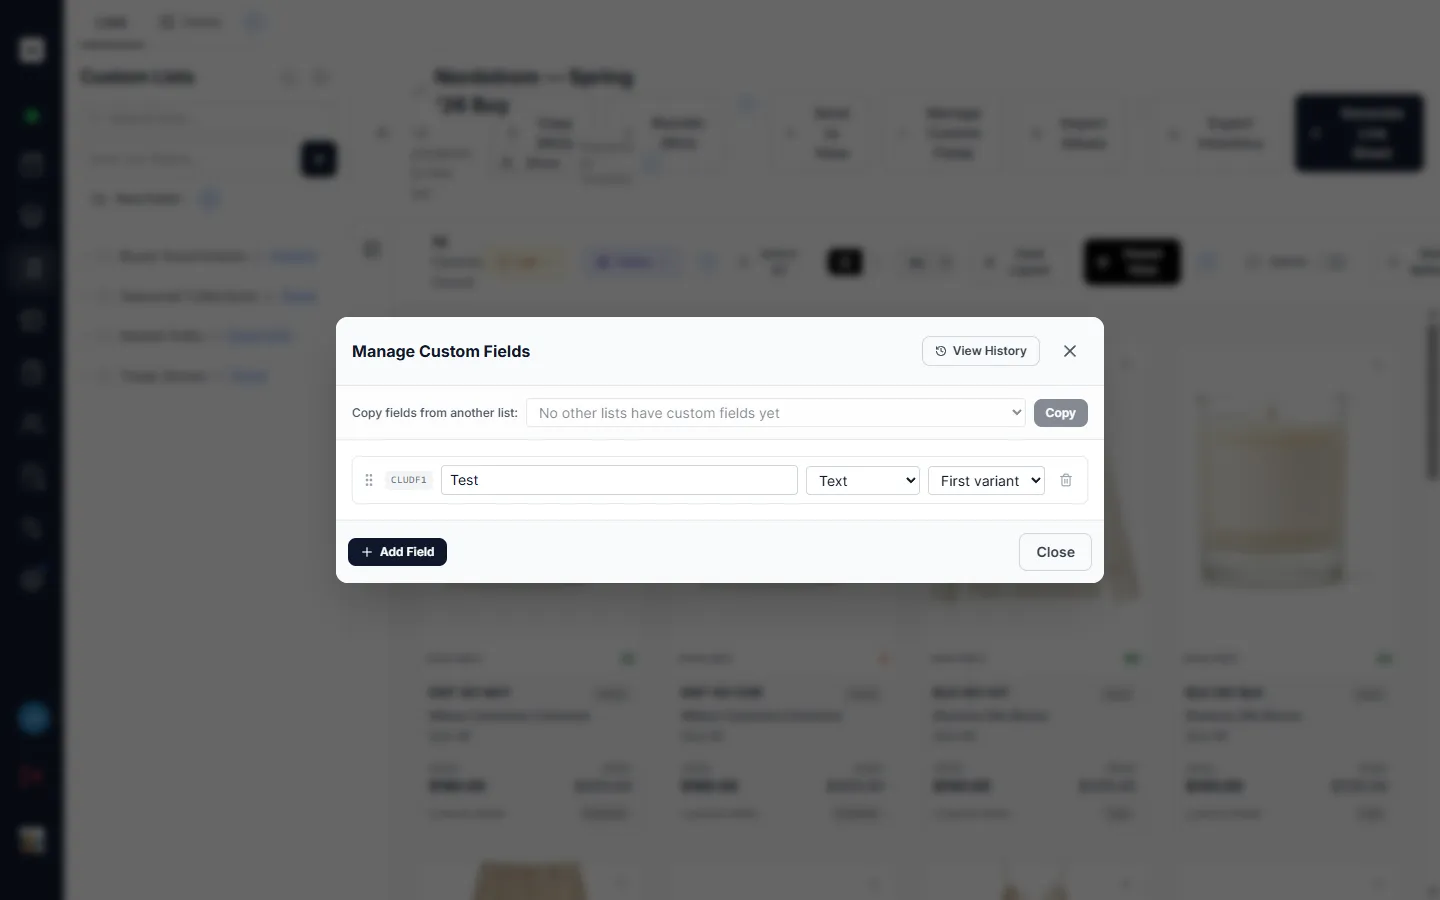
Managing fields — creating, renaming, retyping, reordering, deleting, and copying — requires the Admin role. (Filling in the values is more widely allowed; see Who can do what.)
Creating a field
Section titled “Creating a field”Click Add Field and set three things:
-
Name — the label shown wherever the field appears. Names must be unique within the list (case is ignored, so “Notes” and “notes” collide).
-
Type — how the value is interpreted and formatted:
Type Use it for Notes Text Comments, codes, free notes Anything goes Number Counts, quantities Plain numeric Currency Prices, costs Formatted as money Date Ship dates, deadlines Percentage Margins, sell-through Displays with a %signDecimal Ratios, measurements Choose how many decimal places When you pick Number, Currency, or Decimal, an extra box appears on the field row where you set the number of decimal places to show. (Percentage instead shows a toggle for whether you enter values as whole numbers — 50 = 50% — or as decimals — 0.5 = 50%.)
-
Display — for a parent (style) card that stands in for several variants, this controls how the variants’ values are combined into one:
Display option What the style card shows First variant The value from the first variant that has one All values Every variant’s value, listed together Aggregate Numeric types (number, currency, decimal, percentage) are summed; text types are joined In the single-variant view (one card per item) this setting doesn’t apply — each item shows its own value.
New to styles, parents, and variants? See The Catalogue, which explains how products in the same master style group under one parent card.
New fields are added to the end of the list. You can add up to 50 fields per list; deleting a field does not give you the slot back toward that limit, so remove fields you no longer need with care.
Reordering, renaming, and deleting
Section titled “Reordering, renaming, and deleting”- Reorder — drag field rows into the order you want them to appear on cards and exports.
- Rename or retype — edit the name box or type selector on any row. Renaming is display-only; the values you’ve already entered stay attached.
- Delete — click the delete icon on a row. This removes the field and every value entered for it on this list, so confirm you mean it.
Who can do what
Section titled “Who can do what”| Action | Who can do it |
|---|---|
| Create, rename, retype, reorder, delete, or copy fields | Admins |
| Enter and edit field values | Anyone with a User account role (or higher) who can edit the list — or any Admin who can see it |
| View values | Anyone who can see the list |
A Viewer can open a list and read its custom-field values but cannot change them — the same account-role rule that governs list editing rights. Admins can edit values on any list they can see.
Entering values
Section titled “Entering values”There are three ways to fill in list custom fields, plus a way to pull them out to a spreadsheet.
Inline, in the product detail view
Section titled “Inline, in the product detail view”Open any product from inside the list. When you’re viewing a single variant, its custom fields appear as editable boxes — type a value and it saves automatically a moment later. Clearing a box and leaving it empty removes that value.
The parent (style) view shows the combined value as read-only — there’s no single item to attach an edit to, so use the size selector at the top of the product detail view to switch to an individual variant, then edit its value there. See The Product Detail View for the rest of the panel.
Hot edit across a selection
Section titled “Hot edit across a selection”To set the same value on many products at once, select them in the catalogue, right-click, and choose Hot edit. A small window opens where you:
- Pick which field to write.
- Pick a value from the quick-pick chips, or type a new one. (Admins can curate the chip list — see Quick-pick chip options.)
- Click Apply — the value is written to every selected product, and to every variant of any style you selected.
After applying you’ll see a confirmation with a one-step Undo, and the window stays open so you can select the next batch. Hot edit is most useful when the grid is grouped by the field you’re editing — applying a value re-buckets the products instantly.
Import values from a spreadsheet
Section titled “Import values from a spreadsheet”For bulk data — a buyer’s order file, a forecast export — use Import Values in the list toolbar. The importer walks you through it:
- Choose a file (CSV or Excel).
- Map the columns — SKUMan matches your spreadsheet’s column headers to your fields automatically by field name; adjust any mapping that guessed wrong.
- Preview — rows are matched to products by SKU and flagged as in-list, not in this list, or not found. If some rows are for products that aren’t on the list yet, you’re asked whether to skip them or add them to the list and apply the values.
- Upload — SKUMan writes the values and shows a summary of how many were updated, how many were skipped, and any errors, row by row.
Two rules worth knowing:
- Empty cells are skipped, not cleared. Leaving a cell blank in the file means “don’t touch this value” — it will not erase an existing one. (To clear a value, edit it inline and leave the box empty instead.)
- Bad values don’t fail the whole import. A value that doesn’t fit its field’s type (for example, letters in a Number column) is skipped for that one cell; the rest of the file still imports. Errors are listed in the final summary.
See Importing & Exporting Data for spreadsheet formats generally.
Exporting values
Section titled “Exporting values”Custom-field values travel with the list. They appear on the list’s line sheets and its inventory export, so you can download the data, edit it in a spreadsheet, and bring it back in with Import Values — a clean round trip.
Copying fields from another list
Section titled “Copying fields from another list”Instead of rebuilding a field set by hand, you can copy one from another list. In the field manager, choose a source list under Copy fields from another list and click Copy.
This is a replace, not a merge. Copying wipes this list’s current fields and values and installs a copy of the source list’s fields. (You can’t copy a list onto itself.)
Because a copy is destructive, SKUMan takes a history snapshot of the list’s fields and values just before it runs. Click View History to see recent snapshots and restore one — for example, to undo a copy that overwrote data you still needed. Snapshots cover the most recent changes and are kept for a limited time, so restore promptly if you need to.
Using custom fields elsewhere
Section titled “Using custom fields elsewhere”Once a list has custom fields, they behave like any other product field wherever that list is the working context:
- Group the catalogue by them — use the Sort menu to group the grid by a custom field, with collapsible section headers. When grouped this way, admins can drag cards onto a group header (or use the Organize groups dialog) to move products between values.
- Show them on cards — add a custom field to a card layout so its value prints on every product card.
- Put them on line sheets — include custom fields as card fields, and subtotal the numeric ones (summed order quantities, for instance) in a group’s header banner. See Line Sheets.
Product custom fields (all products)
Section titled “Product custom fields (all products)”Separately from lists, admins can define custom fields that apply to every product in the workspace, from Admin Setup → Custom Fields (the User Defined Fields section). Up to 40 are available, each with a name, a type (the same set: text, number, currency, date, percentage, and decimal), and an enabled switch. Once enabled, these fields show up alongside built-in fields — in filters, on cards, on line sheets, and in imports and exports — for all products, not just those on one list.
Use product custom fields for information that’s intrinsic to the product (a fabric code, a country of origin); use list custom fields for information that’s specific to one buyer or occasion.
Renaming built-in field labels
Section titled “Renaming built-in field labels”Admins can also rename the display labels of built-in fields — for example, showing “Wholesale Price” as “Trade Price”, or “ATS” as “Open to Sell”. This lives in Admin Setup → Custom Fields, under Built-in Field Names.
Renaming is display-only: it changes what people see on screen, on cards, and on customer-facing documents, but it never changes the field’s real name, the import column it matches, the API, or the headers in machine-readable export files. Your existing imports keep working, and your saved card and line-sheet designs pick up the new label automatically.
Quick-pick chip options
Section titled “Quick-pick chip options”The Hot edit window offers quick-pick chips so you can apply a common value in one click. By default the chips are the values already in use for that field. Admins can replace them with a curated list: while hot-editing, use the Edit chips control to enter the exact options you want offered, in the order you want them. Clear the list to go back to the automatic chips. Non-admins always keep the free-text box for entering new values.